1
Our House
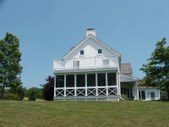
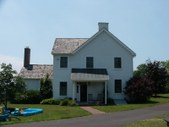
This is our house. It was built in November 1998, but we bought it from the first owner in July 2002. The previous owner was selling because her husband had passed away and she didn't want to stay there without him.
The house was designed to look like a 200 year old stucco over stone farmhouse. It has a true 3-coat stucco exterior and a cedar roof. We added the screen porch on the right side of the house a year ago.
| 
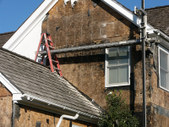
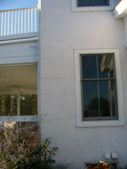
2
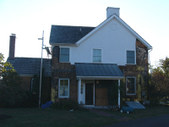
Left Side
We bought the house at the height of a hot market, and in order to compete, we waived the home inspection (thinking the house was only 3 years old - what could be wrong?) We did have an inspection a few months after moving in because we were concerned about a few things, including cracks and stains in the stucco. The home inspector found nothing major wrong and passed the house with flying colors.
This is the left side of the house. The bottom right window is our dining room. The top right window is the master bedroom. The "addition" on the back (with the tall brick chimney) is the family room. The brick chimney vents our family room fireplace.
|

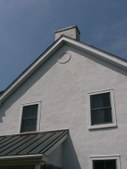
3
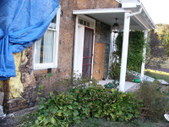
Back Of House
This is the back of the house.
| 
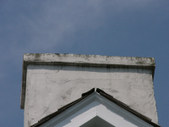
4
Right Side
The 2nd story windows are my kids' bedrooms. The one on the left is my son's, and the right one is my daughter's. The small windows up top are to the attic. This chimney vents the 2 furnaces and the living room fireplace.
|
5
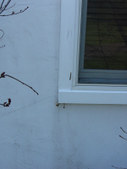
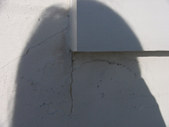
This is the left bottom window on the front of the house.
When we bought the house, some of the windows had window trim that seemed to be slightly rotted, and some of the windows had water stains. Our home inspector told us this was normal, and that we needed to caulk the trim - a simple maintenance procedure.
| 
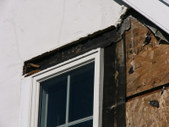
6
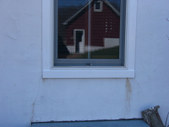
This is the worst staining
It's on the dining room window above the bilco doors on the Left Side of the house. As you'll see shortly, the wall behind this window was essentially falling apart from moisture intrusion and rot, yet our inspector pronounced this kind of stain "normal" and said we needed to caulk.
Incidentally, we can't sue the inspector because our contract with him says all suits must be filed within a year after the inspection. It took us 2 years to find this. Bummer, huh?
|
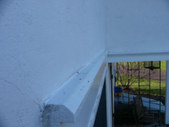
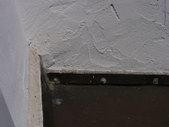
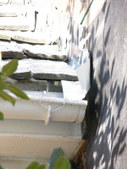
7
Drip Cap
So in March 2005, we started smelling a musty smell (like wet dirt) in several rooms. The master bedroom, our son's room, the laundry room, and the family room were the worst, but we could smell it in just about every room. We traced the smell to the electrical outlets - if we took the plates off, we could smell it coming out of the walls.
We had a mold inspector out who confirmed that the smell indicated that there was moisture and mold in the wall cavities. We contacted a moisture intrusion specialist who suspected the stucco.
He said that stucco over wood framing was vulnerable to cracking and moisture intrusion, and that OSB, the sheathing they used behind our stucco, it is very susceptible to rot and mold. He also noted details like the drip caps over our windows - note that there's no metal flashing, so only a layer of caulk keeps the water out. This cap should also be sloped to drain water - it's not. Water collects on the surface and drips into the wall through ...
| 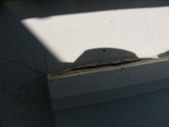
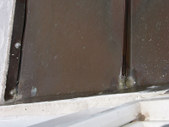
8
Cracked Caulk
Here is what happens when the caulk fails above the drip caps. We had had the trim painted in May 2004, but the painters missed caulking the top of this window. This crack was wide open, letting water pour onto the OSB behind the stucco. If there was metal flashing either on top of or behind this drip cap, the water would have stayed out.
|

9
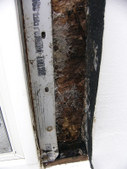
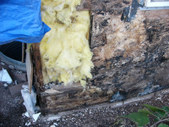
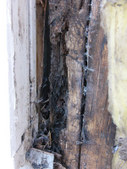
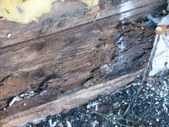
Exploratory Surgery
To confirm our suspicions that the lack of head flashing over the windows was the problem, we pulled off the wood trim around the window with the worst staining (the one you see in picture 6). Here's what we found. The OSB was completely shot - I could stick my finger through it. The black is rotten wood, the white is mold. Yum.
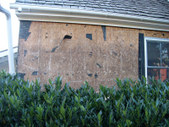
At this point, we decided the best course of action was to remove the stucco, repair the damage, and reside the house in Hardieplank fiber-cement siding. We hoped this would keep the historical look (it looks like wood clapboard) but eliminate the moisture intrusion problems with the stucco.
We got a bunch of quotes and ended up going with a builder who was going to charge $30K for removing the stucco, installing the Hardieplank, and replacing all the wood window trim with Azek (a PVC composite material that looks like wood but doesn't rot). Any repairs that needed to be done (sheathing or stud replacement) would be done on a time and materials ba...
| 
10
Where's the plaster stop?
Up close, you can see that the wood trim was installed completely wrong. The window was nailed to the sheathing, a layer of 30-lb felt was placed over the nail fin, the wood trim was not backprimed and was nailed directly over the felt. Then the stucco was brought up to the wood trim, touching it. There should be a metal stop bead between the stucco and the wood - otherwise the porous stucco just dumps moisture into the wood. Once the wood trim got wet enough (remember, it wasn't backprimed, so it soaked up the water like a sponge), it just held the water against the felt paper until it degraded the felt and rotted the OSB.
|
11
Porch Roof Flashing
At this point, we also decided to repair some other issues during the reside. All of our copper porch roof flashings were done incorrectly and had leaked at one point or another - we had fixed them with caulk, but they really needed to be torn off and redone. Note how the window over the porch is installed touching the roof - there is no way to properly flash an installation like this, and so we decided to replace all the windows that touched a porch roof with shorter windows, adding another $3K to the bill. The flashing around the brick chimney and parts of the cedar roof over the family room were also bad, and during heavy rains, we would have to put buckets in our fireplace to catch the water. So we're replacing the roof and flashing on that section. What the heck - it's only money, right?
| 
12
Typical porch roof flashing
Note the sheer amount of caulk it took to make this stop leaking. Also note how nicely they NAILED through the flashing, then covered it up with gutter seal caulk. Very professional, no?
|
13
Another view of the porch roof
Whoops - looks like we forgot to fold over and flash the tops of the standing seams. That's ok - a couple tubes of gutter seal and we'll be good to go - at least til the sun heats up the metal roof and it moves, cracking the caulk.
| 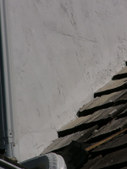
14
Family Room Roof Intersection
This is how the roof of the family room meets the wall of the main house. Note that the stucco comes all the way down and touches the cedar shake shingles - there is no plaster stop. Bad bad bad....
|
15
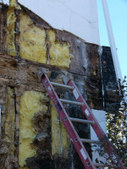
Let the Fun Begin....
Now it's time to tear off the stucco and see what really lies beneath. We're starting on the left side of the house (see picture 2 above).
OK, so when the tearoff began, we expected to find areas of rot below every window (thanks to the lack of head flashing and j-bead around the trim). We thought there might be a little bit of rot under some of the bigger cracks. We were not prepared for the whole wall to be rotten, but that is what we found. This is the area below the 2nd story window to the left of the porch on the left side of the house. We expected the line of rot directly under the edge of the top window, but we have no idea why the corner is rotted so badly.
| 
16
Further down the wall
This is the area next to and below the lower window in the previous picture. The further down the wall, the more rot. Here the OSB just flaked off if you touched it. As the contractor was using a prybar on the stucco, it was sinking through the OSB.
Oh, and did I mention that the grading was done wrong as well? Because the stucco continued directly down from the framing over the foundation with no weep screed, it was impossible to tell from the exterior where the foundation stopped and framing began. When they did the final grading, they buried the rim joist partially in the dirt. This is what happens when you bury a rim joist.
|
17
Another view of that corner
Here's another view of the corner you saw in the previous picture. Note the difference in color in the OSB that was protected by the porch overhang vs. the areas that weren't. While the OSB to the right of the window is not rotted through, it has definitely been exposed to moisture - it's puffy and discolored. We're not sure if it will stay or go yet.
| 
18
Rake Wall - Where's the kickout flashing?
This is the wall immediately to the left around the corner of the wall you just saw. This wall is a rake wall - it has the gable of the adjoining family room addition meeting it. Where the roofline meets the wall, there is supposed to be a kickout flashing that diverts the water coming down that joint out and away from the wall - we had none. Therefore, all the water running off the roof where it was flashed into the wall was channeled behind the stucco. Behind the plywood are some lovely gaping holes, so what you are seeing is actually the GOOD part of this wall.
|
19
Better View of the Rake Wall
Here you can see how the rot starts a little above the roofline and continues down that whole wall and around the corner. A 10-cent piece of metal flashing and 2 seconds to install it could have prevented this. The square of new tarpaper is up there to keep water that runs off the roof now from gushing into the gaping holes in the wall.
| 
20
Oh Wait - THERE'S the kickout flashing
My contractor put it in ... 7 years too late.
This is only temporary - that whole roof is getting replaced, with all new flashings into the gable wall.
|
21
Entire Rake Wall - Another Mystery
Here is anothe view of the rake wall. The rot in the previous picture is mostly hidden behind the bush at the bottom of the window. But why all that discoloration in the peak? Note that the discoloration is present everywhere except very close under the eaves - again indicating that the stucco exposed to any kind of rain was just leaking like heck. Was it cracked? Just too porous? Your guess is as good as mine!
Note too the line of rot running horizontally to the left of the window, right behind the scaffolding. Again, why there? It seems to begin at the gap in the OSB sheets and run downwards. There is a master bedroom shower a few feet to the left of the window and the vent fan runs horizonatally through the ceiling above the window - perhaps this is some kind of condensation thing from the attic if the vent duct is leaking? But the damage seems to originate from the outside in. Who knows?? Suggestions are welcome - add your comments below!
| 
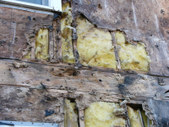
22
Family Room East Wall
Moving around the corner from the rake wall, we come to the family room wall on the left side of the house. This wall is actually semi-ok - the OSB is discolored, but solid, at least til you get to the lower part of the wall. The part behind the bush is kind of trashed. Note that the eaves protected the OSB at the top - it is only the lower part where the rain would have hit it more that is discolored.
|
23
On the other hand...
Moving to the other side of the left side porch, things aren't so pretty. This is the window from picture #6 - the one we did the exploratory surgery on. Things are bad here -- so bad that the window started falling out of the wall as they were pulling sheathing. The studs behind it are gone gone gone...
| 
24
Where's the stud?
See, I told you they were gone.
|
25
Northeast corner - master bedroom subfloor
This is the area above and to the right of the window from the last picture. The corner is very rotten - 2nd floor ribbon board is gone and the subfloor is rotten - we're hoping it's just the bit under the sill and we won't need to pull up the hardwood floors in the bedroom. The stud in the corner of the house needs to be replaced as well. We're going to try to save the other studs. All the insulation you see here is soaked - this is the first spot where the insulation is wet (amazingly, despite all the rot in the other pics, the insulation was dry as a bone).
Incidentally, the musty smell was the worst here in the master bedroom, along this wall. So based on my scientifically proven "stink scale", this should be as bad as it gets. We hope.
| 
26
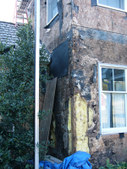
A Distance Shot
Here's a distance shot of the area to the left of the left side porch. You can see that the whole wall is basically gone, except for the area protected by the eaves.
|
27
How bout some closeups?
This is a closeup of the 2nd story ribbon board. That big hole right in the middle? My contractor hollowed that out with his hand. You can reach right through it into the floor joist cavity.
I'd like to take this opportunity to remind you that this house is NOT EVEN 7 YEARS OLD!!!
| 
28
This is the rim joist in the bottom right corner
All rotten. Once again, the combination of bad grading (look how close the dirt is to the framing) and the lack of weep screeds in the stucco (thus, no way for water that gets behind the stucco to get out) has done in the rim joist and sill plate.
|
29
Let's pause and review
This is what the left side of my house looked like on Tuesday....
| 
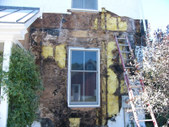
30
Pause & Review part 2
...and this is what it looks like on Friday.
But wait...there's more! Follow the Next link below.
|
31
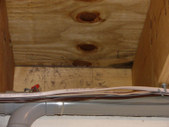
Rim Joist From Basement
This is a random shot of the rim joist taken from the basement. This was covered by batt insulation, which we pulled down. You can see some staining and mildew. This is not in one of the corners that is the most rotten - actually, this is near the front porch on a side of the house we haven't even started yet. Joy.
| 
32
Typical Window Installation
Here is a shot showing you how the windows were "flashed" with 30lb felt. The top trim board on this window was all rotten - it's no wonder. All of the water that was absorbed by the stucco just dumped right down into it. Where's the j-bead/plaster stop? Where's the head flashing? Again, a couple cents worth of metal could have prevented this disaster...
|
33
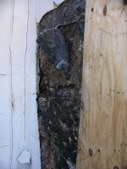
Or could it?
All this rot can't be pinned only on the windows, though. On all the walls we opened up, there is more rot at the corners of the wall than there is under the windows. Why? Well, maybe all these cracks have something to do with it. We caulked these cracks in June, just to keep the water out while we waited for our contractor to come. Until then, they had been wide open. (Remember, our home inspector said the cracks were superficial and nothing to worry about...)
A construction defects engineer (Hi Glenn!) told us that even a very minute crack can suck in amazing amounts of water. And we had LOTS of cracks...especially in the corners. See?
| 
34
More cracks
This is the kind of cracking evident in all the corners. This isn't even in one of the "smelly" rooms. Hopefully, becuase this is the southwest exposure, the sun will have helped to dry and it won't be as rotten as the others.
|
35
One more crack shot
This is the window next to the corner in the last 2 pictures. Again, note the astonishing number of cracks. Perhaps the cement in the stucco was mixed or applied wrong, or not given long enough to cure? Note that there are no expansion joints to allow for stucco movement, so some cracking was inevitable. There's no weep screed either - so no way for water to drain once it gets trapped back there.
On a happier note, the window at the bottom is level with the foundation and those vents are coming through the rim joist. Finally, a spot with proper grading. Let's hope this rim joist is in slightly better shape!
| 
36
Yum....
We interrupt this chronicle of disaster for a cute picture of my son eating hummus for the first time today - a reminder that life does go on, even when your house is rotting apart and your financial situation is getting more precarious with every pry of the crowbar.
|
37
sm CrackWithWaterStaining
| 
38
sm FakeChimneyNoCapShingle
|

39
Another view of the back of the house.
| 
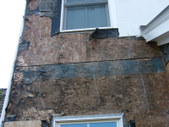
40
More cracks
Here is another picture of the kind of small cracks and slight staining that were evident on the stucco when we bought the house. They seemed to get worse during the 3 years we owned it.
|

41
sm chimney2
| 
42
sm FrontDRWindowRottenTrim
|

43
sm WallNextToShower
| 
44
sm2 LeftSideOfHouse
|