Hutto Soil Testing This page dives into the soil conditions of Hutto. 5/15/2007
Laboratory tests:
Plastic limit The plastic limit (PL) is the water content where soil starts to exhibit plastic behavior. A thread of soil is at its plastic limit when it is rolled to a diameter of 3 mm and crumbles.
Liquid limit The liquid limit (LL) is the water content where a soil changes from plastic to liquid behavior. It is found using a Casagrande device. Soil is placed into the cup portion of the device and a groove is made down its center. The cup is repeatedly dropped until the groove is closed for 13 mm (½ inch). The moisture content at which it takes 25 drops of the cup to cause the groove to close is defined as the liquid limit.
Plasticity index The plasticity index (PI) is a measure of the plasticity of a soil. The plasticity index is the size of the range of water contents where the soil exhibits plastic properties. The PI is difference between the liquid limit and the plastic limit (PI = LL-PL). Soils with a high PI tend to be clay, those with a lower PI tend to be silt, and those with a PI of 0 tend to have little or no silt or clay.
Liquidity index The liquidity index (LI) is used for scaling the natural water content of a soil sample to the limits. It can be calculated as a ratio of difference between natural water content, plastic limit, and plasticity index: LI=(W-PL)/(LL-PL) where W is the natural water content.
My Tests: recently I have had my soil sent in to a lab to get a better idea of what could be causing all the problems here in huttoparke. After reviewing the topology of our area and noting we are prime for expansive soil it was time to move forward with testing which could only bring to light the proof needed that would explain what is really happening to our homes.
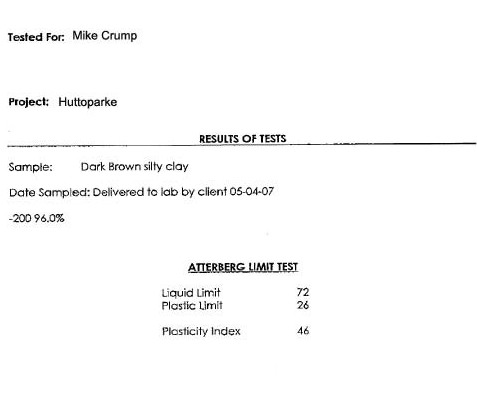
So without further ado, here are the results from my property.
Liquied Limit: 72
Plastic Limit: 26
Plasticity Index: 46
After recieving this info I called the lab to get a professional explanation of what these numbers meant. I knew things were not good from the responses I got from others when mentioning the numbers but wanted the opinion of someone certified in the field. When I asked if this could be classified as non-expansive soil the response I recieved was humorous in that such a thing could be stated out loud. This only confirmed the assumption I have had all along. For those of you who are having your repairs made, I would think it would be in your best interest to target the problem and not bandaid the results of the real issue.
Below is the description of repair for a peir and beam application that would help stable ones house out with expansive soil.
PHASE I
Site Preparation:
First we carefully remove and relocate any shrubs, plants and other vegetation in work areas. Tarps and plywood are placed around these areas to protect the surrounding grass.
Excavation:
Next, access holes are created by hand where pier locations have been determined. If concrete exists in these locations, we must break through these surfaces to create the access holes. The widths of the holes are approximately the size of a common doormat and extend below the surface three to four feet. The excavated dirt is wheel barreled to a protected area of the lawn. For your safety, heavy plywood covers are placed over access holes daily.
Pier Installation:
Then we begin driving the concrete pilings into the ground using a small, quiet hydraulic ram. The first piling in each hole is vertically aligned under the home's grade beam, which extends around the perimeter of the home. Using the weight of the home and the grade beam as a backstop, the ram drives additional concrete pilings further into the ground. This process is repeated until refusal occurs, which is usually about 21 to 23 tons, or three times the given weight of the home at that location.
PHASE II
Leveling
Once each pier has been driven, individual manual hydraulic jacks will be placed upon each pier cap and used to level the home. This process begins with the lowest portion of the home. The lead technician monitors both the reaction of the structure and the interior elevation readings throughout the leveling. Teams move around the house systematically, following the direction of the lead technician, to create a gentle and uniform lift.
Securing:
Once the home is level, or as near the original elevation as possible, one of the hydraulic jacks is removed and replaced with a concrete cylinder. Any nominal space left between the pier and the exterior grade beam is procured with steel spacers. The second jack is then removed and the process is repeated until all piers are secure against the exterior grade beam surrounding the home.
PHASE III
Backfill
The dirt previously removed is then returned to the holes it was excavated from. Any surface concrete breakthroughs are filled and patched.
Cleaning
Trees, shrubs and other vegetation are returned to their original positions and all materials, dirt and debris is taken away.
After reading about the repair process to truely fix the problem I have come to the conclusion that Lennar has bold faced lied to me at closing about what I was buying and the condition of the house in my honest opinion. If I would of known the land in my area was expansive you can rest assured I would not have bought a house here. I did not buy a brand new repaired home in Hutto or pay repaired prices for my home let alone a house that was appraised to be problematic or on expansive soil, so why on earth do they think this is OK? Its beyond me but the real loser here is me and the fact that I have bought a home from Lennar here in Hutto.